


Fresh vegetables are the star of the show in this delicious recipe for giardiniera.
Giardiniera (pronounced jar-DEE-nyair-a, but the Americanized pronunciation is something like jar-DIN–yair) is an Italian word that means roughly “a female gardener” or “from the garden.” It is a condiment made from fresh vegetables, chopped into small bits, and used to top sandwiches and other foods. Technically it is a relish, but it is not at all like an American sweet pickle relish. There are two basic versions: Sicilian style, probably from Sicily, packed in vinegar, and Chicago-style packed in oil.
In Chicago, giardiniera is extremely popular and can be found in the hundreds of restaurants that serve Italian Beef Sandwiches and Italian Sausage Sandwiches where it is practically a required topping. It is in every grocery, and a jar of giardiniera can be found in the door of every Italian American fridge in Chicago. And many others.
In New Orleans, it is used to top muffuletta sandwiches and on nachos at sports stadiums. It can also be used on meatball sandwiches, mortadella, bologna, and practically any other sandwich. Some folks serve it straight with antipasto, straight as a salad, on a salad, in soups, or sauces. Rachael Ray puts it on pasta, and I know of people who use it on scrambled eggs. Think of giardiniera as more of a topping than a relish. Relish is too confining a term for this adaptable condiment.
The Chicago style should not be made at home because it is packed in oil and must be specially processed at a specific level of acidity and cooked at a minimal heat to ensure no botulism spores can survive at room temp. Typically, it is made by salting the veggies aggressively overnight, rinsing, soaking in vinegar, rinsing, packing in oil with oregano, and sterile bottling with high heat. There is no single recipe for giardiniera in Chicago. There are at least a dozen on the store shelves. The exact ingredients and method vary from house to house and bottler to bottler, and it can be made from mild to hot with infinite grades in between.
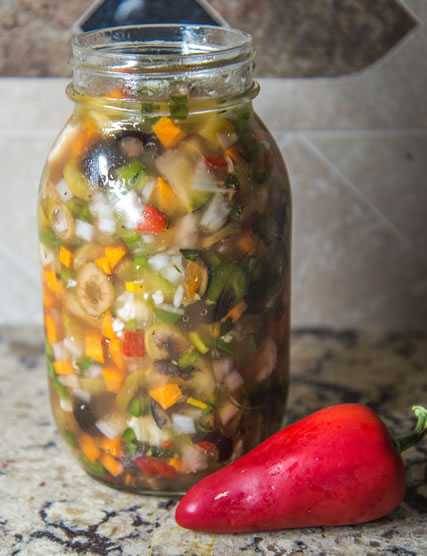
This recipe is closer to the Sicilian style which is simply chopped fresh veggies with vinegar, and salt. Pickled veggies.
A classic simple recipe is just celery, carrots, cauliflower, and hot peppers sterile packed in oil. A popular commercial Chicago brand, Dell’Alpe, is serrano peppers, celery, green olives, and spices. First, they pickle everything in salt and vinegar, drain, submerge the pickled veggies in oil, and heat pasteurize to prevent botulism. The people who make the Marconi brand and the giardiniera for the Portillos restaurants, famous for Chicago Hot Dogs and Italian Beef Sandwiches, use the same ingredients but they add cauliflower and carrots. Pagliaci adds capers. Some kick it up with hot peppers.
Below is my homemade recipe, heavily influenced by a recipe taught to me by my sister-in-law Theresa Tortorello. She is an accomplished Italian American home cook who learned her recipes at the aprons of her immigrant family’s women. She makes a large quantity of her Italian-style giardiniera in August using the bounty of her garden.
Theresa and I like lots of stuff in it. I add onions, garlic, sweet bell peppers, zucchini, and fennel bulbs. You can increase or decrease ingredients to your taste. If you can’t find fennel bulbs, skip them. Want more garlic, go for it. Love pain, add Scotch bonnets. I recommend you start with my recipe and then, after aging it for a few days, you can add more ingredients if you wish. But Chicagoans: Remember, my recipe is more Italian-style. It uses vinegar to make sure it is low enough in pH (acidic) to discourage microbial growth. It can be stored in the fridge for several weeks. Packing in oil is too risky because botulism loves this environment, and scrubbing the veggies is just not good enough to pasteurize them.
Giardiniera can also be canned if you know how. For more info on canning go to the Ball Mason Jar company website FreshPreserving.com.

Italian Giardiniera Recipe
Rate this RecipeIngredients
Method
- Prep. Whisk the dressing ingredients together in a bowl and set aside.
- Make sure all the vegetables are thoroughly washed. Remove the seeds and stem from the hot peppers and sweet peppers. Chop the peppers into 1/8-inch (3.2 mm) chunks. Chop the zucchini, celery, carrots, cauliflower, onion, and fennel bulb into 1/8-inch (3.2 mm) chunks. Slice the olives into rings and finely mince the garlic. Chop the basil and oregano.
- In a bowl, mix the vegetables, olives, garlic, herbs, and pepper together.
- Spoon the veggies into a very clean jar and top them off with the liquid. Make sure the solids are covered in liquid and use a kitchen knife to dislodge large bubbles. If you need it, pour in more oil and vinegar, about 2 parts oil to 1 part vinegar. Screw on a tight fitting very clean lid and refrigerate.
- Serve. You can use it immediately, but you should give it at least three days to allow the juices from the veggies to come out and the flavors to marry. Then shake and taste and make additions as you see fit. It will keep for weeks in the fridge. If you know how to sterile can, you can put a batch up for use all winter.