

I usually cook more food than needed so I won’t be embarrassed by running out, and my guests fight over the leftovers. For ribs, I plan on at least 1 to 1.5 pounds per person for a meal (remember, about half the weight of a slab is bone). For pulled pork and brisket, I also cook about a pound because there is shrinkage and waste before serving. Here’s how to freeze and reheat leftover meats.
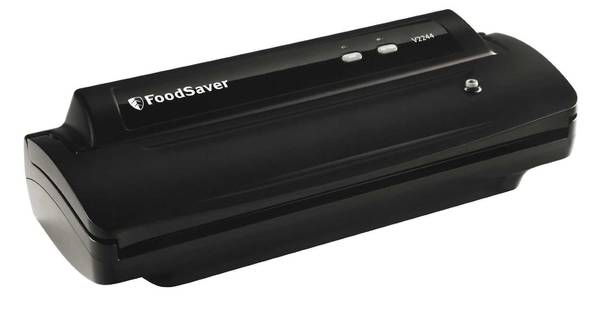
Freezing.The best way to store food more than a week is in the freezer. Foods lose few nutrients and little quality when frozen. But if they are kept for longer than a few weeks, meats can oxidize, fats can get rancid, and the surface can harden from freezer burn. Especially pork and seafood. Oxygen is the enemy. So I pack food for storage is with a vacuum sealer like the FoodSaver Vacuum Sealer. You put the food in a plastic bag, insert it into the machine and it sucks out the air and seals the bag. Make sure you mark the date on the bag. It is a great way to store cooked foods too. Put your pulled pork in the bag, add a little sauce and seal. When it is time to serve, place the bag into a pot of simmering water. It reheats rapidly and tastes almost as good as when it came out of the smoker.
If you don’t have a vacuum sealer, use a zipper bag. Put the meat in the bag, add a little sauce, broth, or stock, and then slowly lower the bag into a pot of cold water. The water will displace the air in the bag. You can then zip it. The idea is to get out as much air as possible to minimize freezer burn and oxidation.
Thawing. When you plan to eat your leftovers, thaw them in the refrigerator. This could take 6 to 8 hours for ribs, longer for thicker cuts. There are some more tips on thawing in my article Thawing Meat. When you are ready to cook, remove the plastic wrap.
Here’s how to reheat:
Indoor oven. If you are going to use barbecue sauce, paint the meat all over. Wrap the meat in two layers of foil being careful not to puncture the foil. Before you seal it add about 1/4 cup of water. This will help keep it from drying out. If you are not using sauce, place a few ounces of broth or stock, water, apple juice, or white wine in the packet of foil. Place the foil wrapped fully thawed meat in a baking pan or cookie tray. Heat oven to about 225°F. The meat will shrink and get tough at higher heats. Bake in foil on a middle rack until the center is 155°F. Ribs may take up to an hour. Larger cuts may take longer. Unwrap ribs and put under the broiler on one side for 5 to 10 minutes with the door open and the light on until sauce begins to bubble. Leave the door open so the thermostat will not turn off the broiler. Do not walk away from the oven because sauce can go from bubbly to carbon black in minutes. Turn the ribs over and broil for a few more minutes until sauce is bubbly. For other meats you can firm up the surface under the broiler similarly. They will not be as good as when they were fresh off the grill, especially since many smoke flavors evaporate with time or they are oxidized, but they should still be mighty tasty.
Grill. If you don’t have a good oven thermometer, get one. Paint the meat on both sides with sauce. Heat grill to about 225°F with the lid closed and use a 2-zone setup. On a gas grill this is probably about medium. Bake in the indirect zone in the foil until the center is 155°F. Unwrap and grill directly over the direct zone for 5 to 10 minutes on each side until the sauce is bubbly. Watch them so they don’t burn.
Microwave. The advantage of the microwave is speed. Microwaves cook differently by getting the water in the meat all excited and essentially steam the meat from the inside, so if you go too long, it can make meat mushy. Meanwhile the fats and sauce can start popping making a mess in the oven. You can prevent this by keeping them in plastic wrap or a plastic container, but I don’t like to use plastics in the microwave. I have not seen indisputable proof, so my behavior could just be superstition, but I have read enough that I am concerned that microwaves release compounds in some kinds of plastics that get into the food and could be harmful. Microwaves can also make the sauce runny while dry heat ovens and grills firm the sauce up and caramelize the sugars. It’s hard to give you precise times for your microwave, start at about a minute and touch them to see if they’re ready.