

A dull knife makes kitchen work harder, and it is downright dangerous. When a dull knife is placed against something like the skin of an apple or onion it can skid along the surface and fly toward your fingers. A sharp knife easily sinks into the food, needs less pressure, and gives you more control.
Click Here To Search Our Reviews And Ratings Of Tools, Toys, And Accessories
If you have Tony the Knife Sharpener, an Italian immigrant who calls comes through Meathead’s neighborhood, you don’t need a knife sharpening device. Otherwise, read on.
Before you buy a knife sharpener, consider your needs, how often you use your knives, and whether you want the sharpening process to be relatively quick and automatic (with, say, an electric sharpener) or more gradual and manual with a set of sharpening stones.
There are three major types of sharpening materials: Carbide, ceramic, and diamond. All actually remove a miniscule bit of metal to produce a new, evenly sharp edge. All of the materials have their uses and price points, and diamond has the longest life by far. These sharpening materials all come in various “grits” of coarseness or fineness.
Generally, you first sharpen with a coarse grit first, then move to a fine grit to finish off your blade with a razor sharp edge. The smaller the grit number, the coarser the material. So 350 grit is more coarse, and 600 is more fine. Across all three materials, there are literally hundreds of knife sharpening devices out there. For these reviews, I selected a representative cross-section of the most common ones.
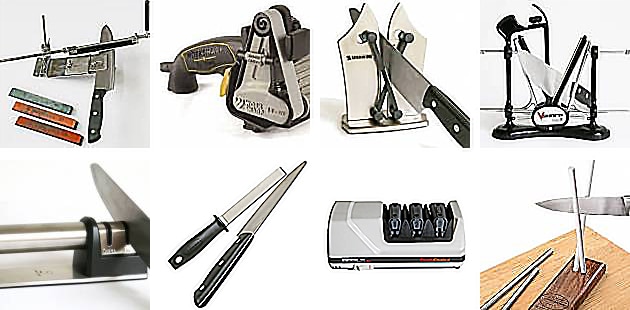
Sharpener designs

1) Sharpening rods. Two rods, either ceramic or coated with diamond dust, are set in a holder usually at 20˚, 25˚, or 30˚. The rods are used by sliding your knife from top to bottom while pulling or pushing along the entire length of the blade and keeping the blade against the rods. This method is easy to learn and a good way to keep relatively sharp knives sharp. Sharpening rods are fairly inexpensive and can often sharpen serrated knives. They are not useful for sharpening a dull knife.

2) V-sharpeners a.k.a. Pull through sharpeners. These are two hardened pieces of tungsten carbide in a hand-held or table-top device in a V-shape. The knife blade is pulled through the V’s several times to sharpen. They are small and easy to keep in a kitchen drawer, can be used to very quickly sharpen blades, can remove small nicks, and are inexpensive. They are, however, inconsistent, as one pull can be too strong and remove too much metal, while a weaker pull does nothing for the other side of the blade. Sometimes the carbide can catch on nicks on the blade, making them worse.

3) Electric sharpeners. Countertop electric sharpeners get the job done quite nicely and much faster than any hand operated sharpening device. They can be moderately to very expensive but do the trick efficiently. Once your blades have been sharpened, you need to use an electric sharpener only once or twice a month to maintain a fine and sharp edge. Most models have either two or three slots, similar to the V-sharpeners, with discs designed for a range of sharpening from rough to very fine. If improperly used, electric sharpeners can wear down a blade rather quickly though, so use caution and moderation with them.

4) Sharpening stone kits. Many experts consider stones to be the best material for sharpening knives. They are also, by far, the most time-consuming to use. A sharpening stone kit typically comes with several flat stones of different coarseness. You start with the roughest and progress to the smoothest. Each stone is lubricated with water or mineral oil. Pick one, you can’t use both.
Water stones need to be soaked in water for at least an hour. With oil stones, you can drizzle oil on the stone just before you begin the sharpening process. Use only mineral oils. Vegetable oils can harden, clog, and ruin a sharpening stone. If you’ve got free time, and don’t mind a repetitive, and somewhat tedious process, have at it.
We are not reviewing sharpening stones at this time. Instead, we will conduct a much more detailed review and test of the best among the huge variety of stones available. We’ll also review the best and worst methods of using sharpening stones.
5) Sharpening steels. These are not sharpeners. Steels cannot remove nicks or sharpen dull blades, and they don’t remove any steel. Instead, they realign the rolled metal edges of knife blade into a straight line, which makes the blade cut better. They are very common and can be used daily to slightly improve a blade’s performance. Steels are easier to use than real knife sharpeners and they are inexpensive. There are three kinds: smooth, ridged, and diamond coated. Because they do not actually sharpen, we did not test any steels at this time. But we do recommend keeping a steel on hand to keep your knife cutting at its best. Here is a link to one we recommend.
6) Strops. A strop is a flat piece of leather, often attached to a thin strip of wood. They have a little flexibility or bend and are used in a similar fashion to steels. However, they are even less effective at sharpening, merely realigning the edges of knives. We did not test any strops, but they are another decent option for honing a knife between uses. We prefer steels.
How I tested
I bought middle of the road chef’s knives at a big box store and all of the tests described below were conducted on these knives. I also tested the sharpeners using some of my own knives, including Henckels, Gerber, Wusthof, and Victorinox chef’s knives.

First, I dulled each knife by running it across a very rough brick a dozen times. I even tapped the blade on a corner of the brick to get some nicks. Then I tested a couple of the dulled knives to see if they were sharp enough to cut a tomato. I guess I did a good job, none of the knives could do more than gouge and mangle the tomatoes. I then followed the instructions for each sharpening device to sharpen the blades as well as I could. After sharpening, I tested each knife by slicing a tomato that sat alone on a cutting board without being held in place.
Then, if necessary, I held and steadied the tomato on the board while trying to slice it. Next, I held and sliced a yellow onion that still had brown skin on it. I also tried to slice off the green tops from carrots in a single stroke. And I cut a thin slice from a styrofoam peanut (this method was suggested by knife master A.G. Russell). Finally, I held an 8 1/2 x 11” piece of ordinary printer paper in my hand and tried to slice it into several pieces. Check out the results below.